N.º de peça do fabricante 5778
ADAFRUIT MATRIX PORTAL S3 CIRCUI
Adafruit Industries LLC
License: See Original Project Laser Cutters LED Matrix Wifi Wireless Arduino Circuit Playground ESP32
Guide by Erin St Blaine
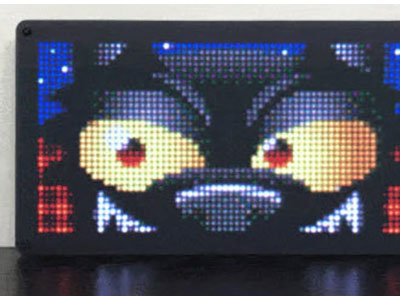
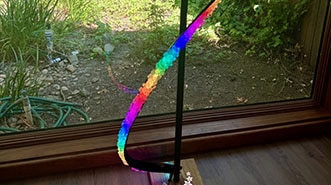
Make a glowing stained-glass window with over 2000 LEDs that animate and glow in hundreds of different patterns and colors, all without writing a line of code. The magic lies with WLED, a free, open-source LED animation program that runs over WiFi. Control your LED matrix with your smart phone or web browser, and watch your creation dance.
This guide uses the MoonModules v 14.5.0 beta ("Small Step") fork of WLED, which works on the MatrixPortal S3. As a bonus, it also contains the Animartrix library of effects -- a large pool of brand-new 2d animations that turn your LED matrix into a whirling kaleidoscope of color.
Use a laser cutter or a Cricut vinyl cutter to create a "resist" layer out of opaque material, and a black LED acrylic layer for diffusion, to make a beautiful stained glass window style art piece that shifts and moves with colored lights.
Inspired by Living Stained Glass as seen at the Autumn Lights Festival in Oakland, CA
1/4" MDF or plywood for the laser-cut image layer
Scotch Glue Dots
The MatrixPortal supplies power to the LED matrix display panel via two standoffs. These come with protective tape applied (part of the Adafruit manufacturing process) which MUST BE REMOVED!
Use some tweezers or a fingernail to remove the two amber circles.
Next, screw in the spade connectors to the corresponding standoff.
red wire goes to +5V
black wire goes to GND
Plug either one of the four-conductor power plugs into the power connector pins on the panel. The plug can only go in one way, and that way is marked on the board silkscreen.
Now, plug the board into the left side shrouded 8x2 connector as shown. The orientation matters, so take a moment to confirm that the white indicator arrow on the matrix panel is oriented pointing up and right as seen here and the MatrixPortal overhangs the edge of the panel when connected. This allows you to use the edge buttons from the front side.
Check nothing is impeding the board from plugging in firmly. If there's a plastic nub on the matrix that's keeping the Portal from sitting flat, cut it off with diagonal cutters.
Place your LED acrylic panel over the front for a beautiful diffusion effect.
At the time of writing, the standard web installer for WLED does not support the MatrixPortal S3. For this project you'll install a MoonModules fork of WLED that's written for the ESP32-S3 chipset.
More information about the MoonModules project can be found here.
For this installation, use the Adafruit WebSerial ESPTool. Download the matrix_wled.bin file linked below and save it on your computer.
Navigate to Adafruit WebSerial ESPTool in your web browser.
Find the BOOT button on your MatrixPortal S3. Hold it down while you plug it into your computer via the USB port. This will get you into bootloader mode.
Click "connect" in the WebSerial ESPtool menu bar and select the MatrixPortal as your serial port.
Click the Erase button to erase the flash. Keep this window open while the ESPtool is working.
Click the top "Choose a file" button and upload the matrix_wled.bin file you downloaded earlier. Click "Program".
Once the program is finished running, you'll get a prompt to reset your board. Click the reset button.
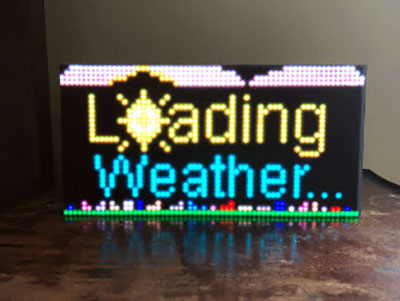
If everything worked, all the lights on the front of your MatrixPortal will turn yellow. Success!
Check your WiFi settings and look for a new network called WLED-AP. This is your MatrixPortal's access point network. Join the network to connect to your MatrixPortal. The next step will be to configure your WiFi credentials and get WLED set up for your matrix.
Click "WiFi Settings" in the window that pops up when you join WLED-AP. Enter your WiFi credentials and then enter a name you can remember in the mDNS field a little further down. This is what you'll type into your location bar in your browser to access the WLED controls.
Click "save", then rejoin your regular WiFi network and type the mDNS name plus ".local" into the location bar (i.e., stainedglass.local).
Now you can control your MatrixPortal from any web browser or smartphone that's connected to your WiFi network.
If you can't connect to your MatrixPortal as a serial port in the ESPTool interface:
Check to see if you're using a charge-only USB cable. These are increasingly common, but you need a cable that will carry data. Use a known good cable.
Try rebooting your computer. Sometimes the USB ports get "stuck" in a connected state
Be sure you're holding the BOOT button down as you plug the board into your computer
For more help, check the Factory Reset page of the Matrix Portal S3 guide
If you can connect and upload the file, but when it finishes you don't get yellow lights or don't see the WLED_AP WiFi network:
Did you erase the flash memory first?
Try refreshing the page between erasing flash memory and loading the code
Try unplugging the board / resetting between erasing and loading
Try a factory reset (see above) and then give it another go
Is your WiFi network 5GHZ only? You need a 2.4GHZ network to connect in access point mode. Try it again at your local coffee shop or your neighbor's house
Click "Config" and go to LED Preferences. This is where we'll set up the matrix size and physical configuration.
If you have just one panel, set Chain Length to 1 and select the correct size of panel from the dropdown. Mine is 64x32.
Next go to Config / 2D Configuration. Select 2D Matrix from the dropdown and some options will appear.
Enter the width and height of your matrix in the appropriate boxes and choose your orientation. You can come back and change this later if you end up hanging it in a different orientation.
Head back to the control screen. With 2D Matrix enabled, you'll see some new effects appear - you now have access to a dozen or so 2D effects. You can filter the effects column by clicking the box next to the little matrix (square) in the toolbar at the bottom of the effects panel.
Select one of the matrix effects and compare your matrix to the simulator at the top of the screen. If it looks the same, you've got everything set up correctly! Time to play.
If it doesn't look quite right, reset your board and repeat the last couple of steps, making sure you have your matrix set up correctly.
This version of WLED comes with a few extra features, including an extended library of graphics by Stefan Petrick called Animartrix (yes, spelled that way!)
Click on Animartrix in the Config screen, then click "Enabled" to turn the effects on.
Reset your MatrixPortal for the changes to take effect.
Head back to the controls and scroll all the way to the bottom of the effects panel. You'll see over 50 new matrix effects to play with on your MatrixPortal. Go wild!
The sliders at the bottom of the effects panel will control speed and/or other aspects of the different modes. Play around to find effects you love. Once you're happy with an effect you can save it as a Preset in the Presets column by clicking + and giving it a name. That'll be done next.
Once your lights are working, it's time for the fun part: creating light animations using WLED presets. This is easy and intuitive in WLED. Choose a color palette and an effect, then play with the sliders at the bottom of the Effect Mode column to customize the effect.
When you find something you like, click the +Preset button in the Presets tab and give your preset a name, then save it. You can reorder them using the "Save to ID" field.
You can create hundreds of presets using the preprogrammed effects, so take some time to play around and see what looks good on your LED strip.
Create at least 3 presets and be sure they are saved to ID numbers 1-3. The next step will be to set up the switch to toggle between these presets.
The WLED preset interface can also be used to send control commands to the LED strip. You can set up the onboard buttons for a wide variety of control functions: change modes, change brightness, toggle the lights on and off, or a whole host of other features.
Each button function in WLED has 3 options: a short press, a long press, or a double press. I want my lights to cycle through presets with a short press, and to turn on or off with a long press. Here's how I set up a control preset for each of these features.
Click +Preset and then uncheck the "Use current state" checkbox. This will open up an API command window within the preset module.
Call the effect "Next_FX" and type {"ps":"1~3~"} into the API command box. This tells WLED to cycle through presets 1-3. If you'd like to cycle through more presets, change the 3 to the number of presets you have.
Be sure your preset IDs include all the numbers -- skipping a number will break this command.
Give your preset an ID number that's above the range of your preset numbers -- I called mine 9.
Create another preset and call it "Toggle". Uncheck the "use current state" checkbox and enter T=2 into the API command box. This will tell the LEDs to toggle between on and off. Save this one to ID 10.
On the next page, these control presets will be connected to a button.
Find out more about creating these control presets here:
https://kno.wled.ge/features/presets/
You can enter either JSON commands or HTTP commands into this command box, giving you a lot of control over your WLED project.
https://kno.wled.ge/interfaces/json-api/
The Matrix Portal has two onboard buttons labeled "Down" and "Up" that can be used to control the lights.
I checked the MatrixPortal Pinout page and discovered that Down is connected to GPIO 7 and up is connected to GPIO 6.
Open up the LED settings screen in WLED under "Config". Scroll to the button setup section and set button 1 to use GPIO 7 and button 2 to use GPIO 6, with the type for both set as "Pushbutton"
Click save.
For buttons 1 & 2:
Short press: Cycles through effects.
Long press: Increases and slightly decreases brightness.
Double press: Cycles through color palettes.
I advise against using button 0. WLED's buttons have some default behaviors written in, and one of button 0's default behaviors is that when it's pressed for more than a few seconds, it resets your microcontroller to factory settings, or resets your WiFi network, or any number of potentially confusing things. I originally had button 0 selected, and I held the button down a bit too long, and .. POOF. All my settings and presets were wiped out.
Let's override the defaults and get these buttons to do what we want.
I'd like the Down button (button 1) to turn the screen on and off, and the Up button (button 2) to cycle through my presets (rather than all the effects modes, as in the default behavior).
This only uses the "short press" feature -- each button can also have a long press and a double-click set up as well if you'd like.
Head to the Time & Macros config screen. Scroll down to the Button actions area.
For button 1, enter the number assigned to the two control presets you made on the last page. My Next_FX preset is number 9, so I entered 9 under "short press",
For button 2, my Toggle preset is number 10, so I've got that set up as a "short press".
If your button isn't working, here are some things to try:
Double check both the LED preferences page and the Time & Macros page to be sure your settings are correct and have saved.
Be sure your presets are correctly numbered. WLED gets confused if the presets have non-sequential IDs (so make sure they're numbered 1, 2, 3 rather than 2, 5, 7).
If your preset file gets corrupted, make sure you entered the code correctly. Forgetting the curly braces or quotes in the Next_FX preset code can make your board hang. If it hangs, you may need to reinstall WLED and repeat the setup process. Find config backup tools under the Security & Updates config settings.
If you add more presets, you'll need to update the Next_FX preset code to include them all. In the guide they toggle through 1-3. Be sure additional presets are sequentially numbered and update Next_FX to include all the presets you'd like.
It's time to bring your vision to life.
Create your own image or find an existing pattern. There are thousands of gorgeous vector files that are ready-to-cut on Etsy for just a dollar or two. Search for "Laser STL" plus your subject matter (I searched for "Octopus" and found mine pretty quickly here). Add search terms with your matrix's ratio -- many are a 1x2 ratio, and size doesn't matter as much since vector files can be scaled to any size with no loss of quality.
Be sure that the finished piece will hold together without any disconnected pieces in the middle. It can also help to put a frame around your design, if it doesn't have one to begin with.
The disconnected designs may come out with a lot of pieces to manage, which is going to make your life more difficult, so try to find a design where everything will come out in one piece.
I cut mine out of 1/4" plywood, but MDF or any other opaque material you have on hand will work. The thickness is not as important as the opacity, but a thicker material will appear to create more "motion" in your finished piece due to the movement of the LED shadows around your resist layer, and a thicker layer will also allow for more diffusion. Even 1/4" of space between the LEDs and your diffusion layer will increase the perceived diffusion by a whole lot.
Learn more about diffusion in our Diffusion Tips & Tricks Guide.
Cut your design to the exact same size as your matrix. I attached mine to the front using Scotch Glue Dots. These are transparent and have a firm hold but can be pulled off pretty easily. It's fun to cut two or three different laser resist layers so you can swap out your design -- perfect for easy Holiday decorating.
Finish by adding your black LED acrylic panel to the front with more glue dots. This material is designed to diffuse LEDs beautifully, and it does a wonderful job of it.
If you need a bigger panel than Adafruit sells, check the Tap Plastics online store - they can cut it to size for you and ship it within a couple days. They have a few different colors and varieties of diffusion acrylic so experiment to get the look you want.